
")
A news ticker is a feature that display the latest news or some informations in a scrolling format in a web page.
You have many options to display a news ticker on a Joomla site: with a third-party extension, with a feature included in your template, etc.
But if you don't want to overheight your website with an extension to maintain, if your template doesnt have such feature, then creating your own news ticker from an override is probably the smartest option.
In this tutorial, you'll learn how to create from A to Z, a fancy news ticker, based on "Newsflash", a Joomla native module:
Here's what you'll learn to create:

Let's start!
Step 1. Create the foundations
For the purposes of this Joomla tutorial, create some articles categories, and add 2 or 3 articles in each category.
Then, create a new "newsflash" module. Setup the parameters (select the categories you've created previously) and display your module on a page of your site.
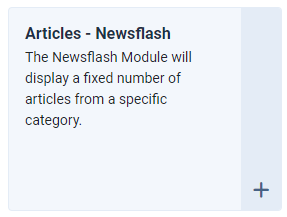
By default, the articles displayed by the module look like this:

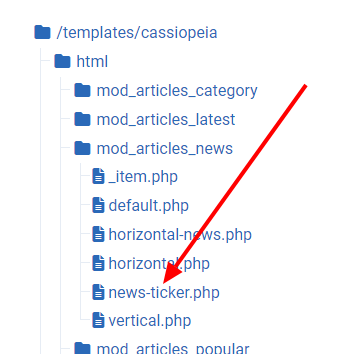
Step 2. Create the override
Now, create an override of the "newsflash" module in your template.
Name your override "news-ticker.php", and click on the "save" button once you're done.
Read also: How to Create Overrides in Joomla
Step 3. The coding
Before coding anything, let's take a look at how the news ticker will be displayed.
Our news ticker is made up of a fixed button and the articles titles scroll over almost the entire width of the page.
We'll use the Bootstrap grid to create the structure (but you can do it with flex, which is also a good web design approach).
<div class="row">

    <div class="col-1">
		<!-- the fixed button -->
	</div>

	<div class="col-11">
		<!-- the scrolling elements -->
	</div>
</div>
Explanations:
The button takes 1/12 of the grid, and the scrolling elements, 11/12.
I. The button
First, we create the button with a Bootstrap icon in SVG format and the text "Breaking News".
Here is the code:
<div class="col-1">
	<div>
		<svg xmlns="http://www.w3.org/2000/svg" width="1rem" height="1rem" fill="currentColor" class="bi bi-lightning-fill" viewBox="0 0 16 16">
			<path d="M11.251.068a.5.5 0 0 1 .227.58L9.677 6.5H13a.5.5 0 0 1 .364.843l-8 8.5a.5.5 0 0 1-.842-.49L6.323 9.5H3a.5.5 0 0 1-.364-.843l8-8.5a.5.5 0 0 1 .615-.09z"/>
		</svg>
		<span>Breaking news</span>
	</div>
</div>
II. The scrolling elements
Basically, we only need to display for each article, the category and the title. No more.
Inside a a PhP loop, we add a <div> with a <span> for the category and then, the item title. And of course, the item title must be clickable.
So the structure should looks like this:
<?php foreach ($list as $item) : ?>

	<div>

		<!-- item category -->
		<span>category title</span>

		<!-- item link -->
		<a href="link-to-the-item">

		<!-- item title -->
		Title of the item

		<!-- end item link -->
		</a>

	</div>

<?php endforeach; ?>
Explanations:
We can read this code like that: for each item of the list, display the category, and the title with a link on it.
Now, we add the PhP codes to display the item's category, the item's link, and the title of the item:
<?php foreach ($list as $item) : ?>

	<div>
		<span><?php echo $item->category_title; ?></span>
		<a href="<?php echo $item->link; ?>">
		<?php echo $item->title; ?>
		</a>
	</div>

<?php endforeach; ?>
Good job!
As expected, this code will display the button, the items and their categories, but not in a news ticker format.
To get the desired result, we need now to style our code with some Bootstrap classes and some CSS classes.
Step 4. The styling
When it's possible, I use the Bootstrap classes because it's already in Joomla, and because it's simplier and faster than rewrite everything in pure CSS.
Of course, feel free to adapt those CSS classes according to your designs and your needs.
I. The button
<div class="col-1 col-sm-1 col-md-3 col-lg-2 py-1 pe-md-0 mb-md-1">
	<div class="bg-secondary text-white text-center py-1 px-2">
		<svg xmlns="http://www.w3.org/2000/svg" width="1rem" height="1rem" fill="currentColor" class="bi bi-lightning-fill" viewBox="0 0 16 16">
			<path d="M11.251.068a.5.5 0 0 1 .227.58L9.677 6.5H13a.5.5 0 0 1 .364.843l-8 8.5a.5.5 0 0 1-.842-.49L6.323 9.5H3a.5.5 0 0 1-.364-.843l8-8.5a.5.5 0 0 1 .615-.09z"/>
		</svg>
		<span class="">Breaking news</span>
	</div>
</div>
Explanations:
- I've added some Bootstrap classes in the first
<div>for the responsive design. - I've styled the button with some Bootstrap classes: grey background, text centered and displayed in white, and some padding around the icon and the text.
II. The scrolling elements
<div class="col-11 col-sm-11 col-md-9 col-lg-10 ps-1 ps-md-2">

	<?php foreach ($list as $item) : ?>
		<span class="badge text-bg-info me-1"><?php echo $item->category_title; ?></span>
		<a class="text-decoration-none link-dark" href="<?php echo $item->link; ?>">
		<?php echo $item->title; ?>
		</a>
		<?php endforeach; ?>
</div>
Explanations:
- I've added some Bootstrap classes in the first
<div>for the responsive design accordingly to the classes previously added for the button. - I've styled the category name with some Bootstrap classes: badge format, background blue with text in black, and a light right margin.
- I've styled the item title with some Bootstrap classes: removed the underline effet on the link, and coloured the link in dark.
III. The news ticker CSS classes
For that part, we'll add the CSS classes directly in the module override. As usual, we start from the container and finish with the item.
The container
The news ticker should be displayed on the all width of the page. The content should be displayed in the container only. So with the hidden value, the overflow is clipped, and the rest of the content is hidden. Using the overflow property is a good practice when you want to have a better control of your layout.
.ticker-container {
	width: 100%;overflow: hidden !important;
}
The wrapper
Now, we use some pseudo-classes for the wrapper. Note the name given to the @keyframes rule.
.ticker-wrapper {
	width: 100%;
	padding-right: 100%;
	background-color: transparent;
	}
	@keyframes ticker {
		0% {transform: translate3d(0, 0, 0);}
		100% {transform: translate3d(-100%, 0, 0);}
	}
The transition effect
Here, I combine different animation properties to get the desired result:
- the
animation-iteration-countproperty specifies the number of times the animation should be played. - the
animation-timing-functionspecifies the speed curve of the animation. - the
animation-nameproperty specifies the name for your @keyframes animation (see above). - and finally, the
animation-durationproperty sets the duration (in seconds or milliseconds) of the animation. Careful, if you don't add this property, the duration is 0, and your animation will never be played.
.ticker-transition {
	display:inline-block;
	white-space:nowrap;
	padding-right:100%;
	animation-iteration-count:infinite;
	animation-timing-function:linear;
	animation-name: ticker;
	animation-duration: 65s;
}
The effect on the items
The animation-play-state CSS property sets the animation on pause when the cursor hovers the item.
.ticker-transition:hover {
	animation-play-state: paused;
	cursor: pointer;
}
and finally, the item itself.
Nothing particular but note that inline-block allows you to set a width and height on the element, if needed. Here, I've set some left and right paddings to give space around each items.
.ticker-item {
	display: inline-block;
	padding: 0 2rem;
}
Here is the complete CSS classes
.ticker-container {width: 100%;overflow: hidden !important;}
	.ticker-wrapper {width: 100%;padding-right: 100%;background-color: transparent;}
	@keyframes ticker {
		0% {transform: translate3d(0, 0, 0);}
		100% {transform: translate3d(-100%, 0, 0);}
	}
	.ticker-transition {display:inline-block;white-space:nowrap;padding-right:100%;animation-iteration-count:infinite;animation-timing-function:linear;animation-name: ticker;animation-duration: 65s;}
	.ticker-transition:hover {animation-play-state: paused;cursor: pointer;}
	.ticker-item {display: inline-block;padding: 0 2rem;}
Step 4. The final steps
It's time to grab all our elements in one and same code and to display our Joomla news ticker.
Open the override you've created earlier in this tutorial.
Select all the code displayed in the editor and erase it. Yes, do it !
In this empty space, you'll copy/paste the following codes:
I. The PhP markup
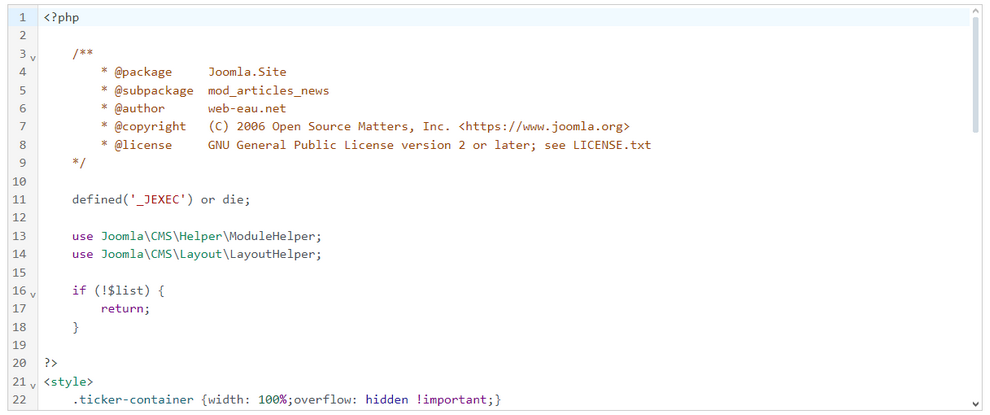
The header
All the files of a newsflash Joomla module start with those lines.
Copy and past those lines in the editor:
<?php

	/**
		* @package     Joomla.Site
		* @subpackage  mod_articles_news
		* @author	   web-eau.net
		* @copyright   (C) 2006 Open Source Matters, Inc. <https://www.joomla.org>
		* @license     GNU General Public License version 2 or later; see LICENSE.txt
	*/

	defined('_JEXEC') or die;

	use Joomla\CMS\Helper\ModuleHelper;
	use Joomla\CMS\Layout\LayoutHelper;

	if (!$list) {
		return;
	}

?>
Just below, copy / past the CSS classes:
<style>
		.ticker-container {width: 100%;overflow: hidden !important;}
	.ticker-wrapper {width: 100%;padding-right: 100%;background-color: transparent;}
	@keyframes ticker {
		0% {transform: translate3d(0, 0, 0);}
		100% {transform: translate3d(-100%, 0, 0);}
	}
	.ticker-transition {display:inline-block;white-space:nowrap;padding-right:100%;animation-iteration-count:infinite;animation-timing-function:linear;animation-name: ticker;animation-duration: 65s;}
	.ticker-transition:hover {animation-play-state: paused;cursor: pointer;}
	.ticker-item {display: inline-block;padding: 0 2rem;}
</style>
and finally, add the end of the code for the news ticker:
<div class="row pt-2 px-2 mx-auto">
    <div class="col-1 col-sm-1 col-md-3 col-lg-2 py-1 pe-md-0 mb-md-1">
		<div class="bg-secondary text-white text-center py-1 px-2">
			<svg xmlns="http://www.w3.org/2000/svg" width="1rem" height="1rem" fill="currentColor" class="bi bi-lightning-fill" viewBox="0 0 16 16">
				<path d="M11.251.068a.5.5 0 0 1 .227.58L9.677 6.5H13a.5.5 0 0 1 .364.843l-8 8.5a.5.5 0 0 1-.842-.49L6.323 9.5H3a.5.5 0 0 1-.364-.843l8-8.5a.5.5 0 0 1 .615-.09z"/>
			</svg>
			<span class="">Breaking news</span>
		</div>
	</div>

	<div class="col-11 col-sm-11 col-md-9 col-lg-10 ps-1 ps-md-2">
		<div class="ticker-container pt-2 pb-1">
			<div class="ticker-wrapper">
				<div class="ticker-transition">

					<?php foreach ($list as $item) : ?>

					<div class="ticker-item">
						<span class="badge text-bg-info me-1"><?php echo $item->category_title; ?></span>
						<a class="text-decoration-none link-dark" href="<?php echo $item->link; ?>">
						<?php echo $item->title; ?>
						</a>
					</div>

					<?php endforeach; ?>

				</div>
			</div>
		</div>
	</div>
</div>
Now, the beginning of your news-ticker.php file should looks like this:
You can download the complete file of this Joomla override.
II. Displaying your news ticker module
Now, go back to the module you've created at the first step of this tutorial, and open it.
Open the Advanced tab and for the Layout parameter, select news-ticker in the dropdown list.
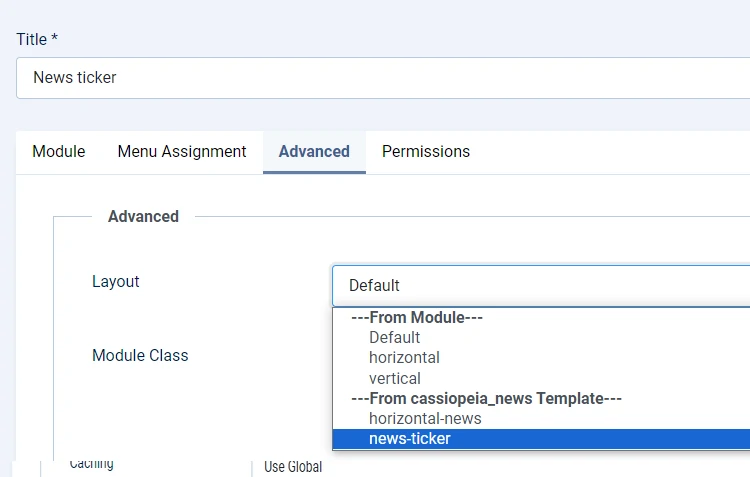
Now, refresh the page where your module is displayed. Your news ticker module should looks like the demo.
Conclusion
Et voilà, you did it!
Congrats, your News ticker joomla module is online. I hope this tutorial was easy to follow and it helps you to create an awesome news ticker module in your Joomla site. Of course, this one is pretty basic and you can freely improve its design, for example.
I really hope you learned something news thanks to this tutorial, and if it's so, don't hesitate to share it with your friends.
Thanks for reading and for sharing.

